Getting Started with Express
Getting Started with Express: Bringing Greenfield Community Center Online
1. Problem Statement
A Day at “Greenfield Community Center”
Greenfield Community Center wants to help neighbors stay connected.
-
They want a simple website where people can check upcoming events, sign up for classes, and send questions to the staff.
-
Right now, all requests come in by phone or handwritten notes, which get lost or mixed up.
-
The center’s team is excited to put everything online, but they’ve never set up a web server before and don’t know where to start.

The challenge:
How do you set up a simple, reliable system that listens for online requests and responds with helpful information-so the community center can serve everyone efficiently and never lose a request again?
2. Learning Objectives
By the end of this tutorial, you will be able to:
-
Understand what Express is and why it’s useful.
-
Install Node.js and Express on your computer.
-
Create and run a simple Express web server that responds to requests.
-
Understand the basic parts of an Express app and how they work together.
3. Concept Introduction with Analogy
Analogy: The Digital Reception Desk
Think of Express as the digital receptionist at the community center:
-
When a neighbor walks in (makes a request), Express greets them and listens to what they need.
-
If someone asks about upcoming events, Express checks the calendar and gives a list.
-
If someone wants to sign up for a class, Express writes down their info and confirms their spot.
-
Express never loses a note and always responds politely, making sure everyone feels heard.
What Is Express?
-
Express is a lightweight web framework for Node.js.
-
It makes it easy to build web servers and APIs, so you can handle requests and send responses without a lot of boilerplate code.
-
Express lets you define routes (URLs/endpoints) and handlers (functions that respond to requests).
Why Use Express?
-
Minimal and flexible: you only add what you need.
-
Huge ecosystem and community support.
-
Easy to learn, even for beginners.
-
Used by companies and organizations of all sizes.
What is Node.js and Why Do You Need It?
-
Node.js is a runtime that lets you run JavaScript code outside the browser, on your computer or server.
-
Express is a library that runs on Node.js to help you build web servers easily
5. Installation of Prerequisities
Let’s help Greenfield Community Center get online!
Step 1: Install Node.js
-
Go to nodejs.org
-
Download the LTS (Long Term Support) version for your operating system.
-
Run the installer and follow the prompts.
-
Install it on your computer.
-
Open your terminal (Command Prompt, PowerShell, or Terminal app). and check installation:
node -v
npm -v
Step 2: Initialize Your Project
- Create a new folder for your project:
mkdir greenfield-center
cd greenfield-center
Initialize a Node.js project:
npm init -y
This creates a package.json file to track your project’s dependencies and settings.
Step 3: Install Express
- Install Express as a dependency:
npm install express
- This downloads Express and adds it to your project’s dependencies.
What’s happening here?
-
npm(Node Package Manager) downloads Express and puts it in a folder callednode_modules. -
The
package.jsonfile is updated so anyone can install the same dependencies withnpm installin the future.
Step 4: Create Your First Server
- Create a file called
app.jswith the following code:
const express = require('express');
const app = express();
const port = 3000;

// Route for the homepage
app.get('/', (req, res) => {
res.send('Welcome to Greenfield Community Center!');
});

// Start the server
app.listen(port, () => {
console.log(`Community Center server running at http://localhost:${port}`);
});
5. Step-by-Step Data Modeling & Code Walkthrough (Deep Dive)
Let’s see how each part of your Express setup directly solves the Greenfield Community Center’s problem.
A. Creating the Express App
Create a file called app.js in your project folder.
const express = require('express');
const app = express();
const port = 3000;
Explanation:
-
require('express')loads the Express library. -
express()creates an application object (app)-your digital receptionist. -
portis set to 3000, meaning your “front desk” will listen for visitors athttp://localhost:3000.
B. Defining Routes: How Express Listens and Responds
app.get('/', (req, res) => {
 res.send('Welcome to Greenfield Community Center!');
});
Explanation:
-
app.get('/')sets up a “route” for the homepage. -
When someone visits
http://localhost:3000/, Express runs this function. -
reqis the incoming request (what the visitor is asking for). -
resis the response object (how you reply). -
res.send()sends a plain text response back to the browser.
How does this solve the center’s problem?
- Every online visitor gets a friendly welcome message-no more lost or ignored requests.
C. Adding More Routes: Serving Community Info
app.get('/events', (req, res) => {
 const events = [
   'Yoga Class - Monday 7pm',
   'Gardening Workshop - Wednesday 5pm',
   'Book Club - Friday 6pm'
 ];
 res.json(events);
});
Explanation:
-
This route listens for GET requests to
/events. -
When someone visits
http://localhost:3000/events, Express sends back a list of events as JSON (a common data format). -
res.json()automatically sets the correct headers and formats the data.
How does this help?
- Neighbors can now check upcoming events anytime, without calling or writing notes.
D. Starting the Server with app.listen()
app.listen(port, () => {
 console.log(`Community Center server running at http://localhost:${port}`);
});
What’s happening under the hood?
-
app.listen()tells Node.js to start an HTTP server on the specified port. -
Express takes over as the “request handler” for this server.
-
When a browser (or any client) connects to
localhost:3000, Node.js hands the request to Express, which matches it to your routes and runs the right function. -
The callback in
app.listen()runs once the server is ready, so you know when to start testing.
How does this solve the center’s problem?
- The community center is now “open for business” online-ready to greet every visitor and answer every request, 24/7.
E. Running and Testing Your Server
- In your terminal, start the server:
`node app.js`
-
Open your browser and visit:
-
http://localhost:3000/(should show your welcome message) -
http://localhost:3000/events(should show your events as a list)
-
Troubleshooting tips:
-
If you get an error about the port being in use, try changing
const port = 3000;to another number (like 3001). -
If you see “Cannot GET /something,” make sure you’ve defined a route for that path.
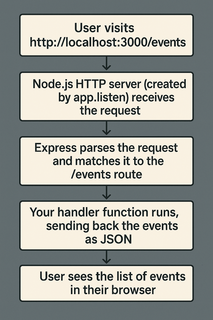
F. Visual Flow: How Express Handles Requests
G. How This Setup Directly Solves the Community Center’s Needs
-
No more lost notes: Every request is logged and answered automatically.
-
Always available: The server runs day and night, so neighbors can get info anytime.
-
Easy to expand: Adding new features (like
/classesor/contact) is as simple as adding new routes.
6.Challenge
Your Turn!
-
Add a new route
/contactthat returns the center’s contact email and phone as a JSON object. -
Test it by visiting
http://localhost:3000/contact.
7. Common Pitfalls & Best Practices
| Pitfall | Best Practice |
|---|---|
| Forgetting to run node app.js | Always run your server to test changes |
| Using wrong HTTP methods | Use GET for reading, POST for creating |
| Not installing dependencies | Run npm install before running code |
| Hardcoding ports | Use environment variables for flexibility |
8. Quick Recap & Key Takeaways
-
You installed Node.js and Express, and created your first server.
-
Express routes map URLs to responses, letting you serve content or data.
-
app.listen()starts your server, making it available to anyone who visits. -
This setup is the digital “front desk” for your community center-always open, always organized.
9. Optional: Programmer’s Workflow Checklist
-
Install Node.js and npm.
-
Initialize project with
npm init -y. -
Install Express with
npm install express. -
Create
app.jsand define routes. -
Run your server and test routes in a browser.
-
Add new routes as your needs grow.